You probably never give much thought to what’s behind the walls, but like our own bodies, that is where the life support system resides. It can be costly to fix after the walls are finished, it’s like undergoing bypass surgery – very invasive. Especially in this case, since we are spraying in foam insulation. Just about everything will be glued in place with little opportunity to pull in extra wires or move the plumbing or duct work.
It took me much longer than I had anticipated to get all the rough plumbing and electrical done – almost a month. The plumbing went in pretty easily as I used PEX. The electrical, however, seemed to drag on.
A few notes on the plumbing. I debated a long while about the merits of PEX over PVC. I certainly recognized the advantages of PEX, but the material costs were driving me back to PVC. And though on the surface, the two look comparable, when you throw in a central manifold, and the tooling, PEX was about 20% more. Of course the labor cost is less, but my time is free (sorta). So I ended up using a combination of PEX and PVC. Instead of using a central manifold, I just branched off of a mainline, thus saving $100+. I just don’t see the need to have a central manifold – I would have only had 4 trunks off the manifold (one for each bathroom, the kitchen, and the laundry room). Sure it’s nice to be able to shut off entire sections of the water system in the event of leaks, but I just couldn’t justify the added cost of the manifold itself, plus all the extra tubing. Besides, I can still cut off the main supply and work on the leak. So by combining PVC and PEX, I get the best of both worlds – easy installation, and comparable cost. My final configuration consists of a 1″ incoming water supply running the length of my house with 1/2″ PEX branching off to each fixture. The hot water heater is supplied by a 3/4″ PVC line. The hot water goes to the fixtures via a 3/4″ PEX main trunk with 1/2″ PEX branching off of that. It all seems to work fine and installation was a snap because the PEX allows you to run continuous lengths of pipe through the walls with no fittings (thus reducing the installation time and potential for leaks).
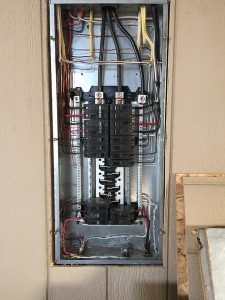
For the electrical system I installed a 200amp main lug distribution panel in the shop which is fed from the 200amp breaker panel on the utility pole outside. The main lug panel does not allow me to kill all the power locally – I have to walk out to the pole to do that. In hindsight, the cost for a main breaker panel isn’t that much more, and probably would have been a better choice. (I can retrofit the main lug to a main breaker if I want to). I tried to save a few dollars. The remainder of the electrical system is pretty typical. I installed a 125amp (fused down to 60amp) subpanel in the upstairs/attack in the event I want to finish that out, and a 75amp subpanel (fused down to 50amp) in the shop so I can feed an arc welder or future expansion (RV hookup). Because everything will be encased in spray foam insulation, I had to make sure I had everything covered as well as anticipate future growth. Like I said, there is no going back in and pulling new wire. So to be sure, I ran a few spare circuits out of the panel and up into the upstairs/attack. I’m hoping with the spare circuits and the sub panels I will be able to accommodate future needs.
There were a few additional “tricks†I employed: In the shop area, I ran a 12/3 wire to all of my receptacles. When I install my outlets, I will have a pair of duplex outlets in each box, one on each leg of the 220v circuit. This allows me to have both 110v & 220v (at 20amps) throughout my shop. I did this in my last shop and made a special adapter that plugs into each of the 110v duplex receptacles to feed a 220v outlet. I know it doesn’t describe well, but I’ll put a picture of my adapter in here soon and hopefully that will be clear. Another “trick†was to make all my long runs with 12 gauge wire from my panel on 20 amp breakers, then step down to 14 gauge wire at the first outlet for ease of installation. I’m sure this is a code violation but let me explain. 14 gauge wire is only rated for 15amps, but that is good for 100ft runs. By reducing my length of 14g to less than 50 feet, and knowing that every household appliance is designed to pull less than 15 amps I feel safe in running 20 amp circuits. And per code, each branch has 10 or less receptacles/lights on it. The reason for 20 amp feeds is that I have a real aversion to the lights dimming when you turn on the clothes iron or toaster. Yes, I could have installed more 15 amp circuits and reduced the number of receptacles, but this way I get by with pulling less wire. For my kitchen, I went with 20 amp circuit and 12 gauge wire to every outlet. Overkill I’m sure, but again, you only get one chance.
Don’t forget the coax (for TV), cat V (network), and phone lines! I pulled a few spares of those too in the event I change providers or technology.
For the air conditioning/heating ducts, I went with a combination of duct board and flex duct. I’m going to have a separate post on the AC system because it is a worthy story
And finally the insulation. I chose to spend the extra money on spray foam insulation as opposed to your more traditional cellulose or fiberglass. Metal buildings have lots of seems and joints that leak air, and leaking air is the death of efficiency. Additionally, the metal radiates heat like crazy. By spraying expanding foam insulation I can insulate the entire building envelope, as well as the living quarters. This creates an airtight living space, surrounded by an insulated building – super efficient. The downside of doing this, however, is the enhanced need to manage humidity & moisture. Most houses are designed to vent moisture to ensure mold doesn’t grow. By sealing the entire building, there is no way for the moisture to escape. So to prevent mold growth, I have to rely on my AC system, which in Texas, we run year-round. By properly designing my AC, I can manage the humidity AND gain the advantage of high efficiency insulation.
Take a look at the pictures, and if you have questions, drop me a note in the comments.
Combination of duct board and flex duct keeps the ductwork in the ceiling, as opposed to the second floor area.
Planning for future bathroom in upstairs/attack
Installing spray foam


Add Comment